Android Localization Tutorial
Source In this tutorial we show how to write multilingual Android apps.
To build multilingual Android apps you need to collect the texts into resource files and translate them.
Once you provide the translation, Android OS will choose the resources that match user’s locale. If your application is available in several languages, Android will select the language that the device uses.
In this tutorial, we’ll cover:
- Application localization process
- Translating strings
- Localizing images
- Running and testing the localized application
- Localization checklist
- Sample multilingual Android app for download
Android loads text and media resources from the project’s ‘res’directory. Additionally, Android can select and load resources from different directories, based on the current device configuration and locale.
1. Application Localization Process
For example, if the code loads a string called ‘R.string.title’, Android will choose the correct value for that string at runtime by loading the appropriate strings.xml file from a matching‘res/values’ directory.In order to have a multilingual Android app you need to provide Android with the localized resource files.
If the locale is ‘en-US’, Android will look for a value of“R.string.title” by searching the files in the following order:
- ‘res/values-en-rUS/strings.xml’
- ‘res/values-en/strings.xml’
- ‘res/values/strings.xml’
Let’s go over a sample application to better understand the localization process. This is a very simple single-language application which displays a country’s image and a text view according to the language set in the device. The structure of the project will be as shown in the figure 1.
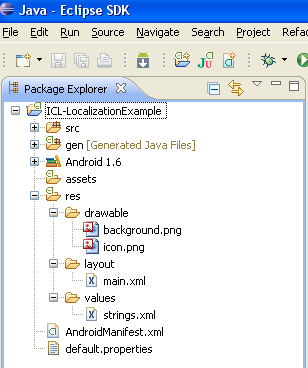
Figure 1: Structure of the sample project
The application doesn’t check the user’s locale and always executes the same, for any locale setting. A screen-shot of the sample application is shown in figure 2. Note that the background image refers to an image of the United States and the text is in English (default locale setting).
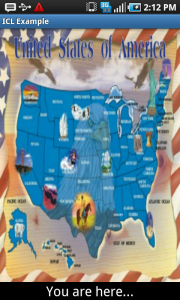
Figure 2: Snapshot of the sample single-language application.
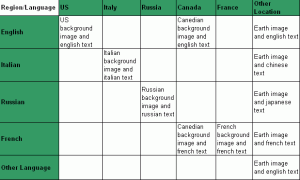
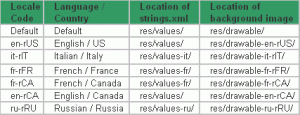
Our first step towards localizing this app is to plan the way an it should display differently for different locales. We’ll add locale-specific information for Italy, France, Canada, and Russia. Table 1 details the different display options for different locales.
Table 2 shows the paths to the different resource files and which ones are used for which locale.
As shown in Table 1, we’ll have six background images (5 locales specific and one default). We’ll also have three sets of string translations (Italian, Russian and French).
Translations go under folders named values-<language>.
The language part of the folder name contains the language ISO code and an optional region code, preceded by lowercase r.
For example:
- Without region code: fr
- With region code: fr-rFR or fr-rCA
The application selects the resource files to load at run-time, based on the phone’s locale. If no locale-specific resources are available, it falls back on the defaults. For example, if we’re in Switzerland, and the phone’s language is set to French, Android will first look for a folder called fr-rCH. If it can’t find it, it looks forfr and if that’s not found too, it loads the resource files for the default language.
It does that for each resource type, so we can have French strings with the default graphics, or any other combination of translated resources.
2. Translating Strings
The application requires four strings.xml files, one for each in English, Italian, French, and Russian.
The procedure for creating strings.xml files is as follows:
- Translate the strings.xml file to each language.
- Create three new folders under res – values-it, values-fr and values-ru (The original values folder already exists).
- Place the translated strings.xml files in the respective folders.
For fast and efficient and affordable translation, you’re welcome to try our professional Android localization service. Our system parses your resource files, extracts all the texts and then builds the translated resource files, ready to be used in Android.
3. Localizing Images
Our application also needs six more drawable folders, each containing a variant of the background image.
Place background image that has to appear for a respective language in corresponding folders under the project workspace of the sample application as specified in Table 3.
If your images contain texts, we recommend creating copies of the texts in your strings.xml file. This way, translators can translate just the texts, and you can rebuild the localized images.
| Background image | Destination folder in project workspace |
|---|---|
| Italian | drawable-it-rIT/background.png |
| French | drawable-fr-rFR/background.png |
| French (Canada) | drawable-fr-rCA/background.png |
| English (Canada) | drawable-en-rCA/background.png |
| Russian | drawable-ru-rRU/background.png |
| US English | drawable-en-rUS/background.png |
| Default (Earth image) | drawable/background.png |
Table 3: Background image and the respective destination folders.
After you save the strings.xml and background image files in their target folders, the project workspace looks like this:
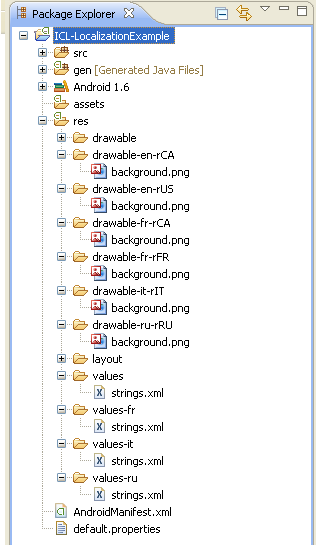
Figure 3: Structure of the sample multi-lingual Android app
4. Running and Testing the Localized Application
Once the localized string and image resources are added to the project workspace, the application is ready for testing. To test it, we can set different locales via Home > Menu > Settings > Locale & text > Select locale.
Depending on configuration of the device, some devices may offer only a few locales or may not offer any alternate locales via the settings application. However, the Android emulator will offer a selection of all the locales that are available in Android OS. To set the emulator to a locale that is not available in the system image, you can use Custom Locale, available in the Application tab.
Figure 4 shows some of the expected results that we should see after setting the region and language in the phone.
Figure 4: Expected results after localization.
5. Localization Checklist
Now that we understand how to use the Android development framework for multilingual apps, let’s go over a short checklist which reminds us the steps we need to take.
- Never hard-code strings or string constants; Instead use the R.string and strings.xml files.
- Similarly, don’t hard-code images or layouts; use R.drawable and R.layout
- Translate the strings.xml files and localize your images.
- Place your localized resources in the appropriate directories under ‘res/’.
Sample Multilingual Android App
Throughout this tutorial we’ve used a sample application, written especially to explain how to create multilingual Android apps.
From developer doc android developer
For Sample Source Clik Source



hi i am ganesh u r blog is awesome .........am a fresher in android development,i have learnt so many things from u r blog...
ReplyDeletei am developing smschat App,,it contains list of messages,i want to set the date & time to each message,the date & time shoud update every time....in textview but am unable get set the date & time
so plz could u help me in this app....
my mail id is:ganeshmudhiraj12@gmail.com
my code is as follows......
GregorianCalendar calCreationDate = new GregorianCalendar();
int intMilli = calCreationDate.get(Calendar.MILLISECOND);
int intSeconds = calCreationDate.get(Calendar.SECOND);
calCreationDate.add(Calendar.MILLISECOND, (-1*intMilli));
calCreationDate.add(Calendar.SECOND, -1*intSeconds);
calCreationDate.add(Calendar.MINUTE, 1);
Date dateStartDate = calCreationDate.getTime();
String time =dateStartDate.toString();
Thanks.....
M.Ganesh